[AWS-EKS] 프로젝트 셋팅
- myeks 원클릭배포 진행
- 옵스뷰 설치
- 아르고 설치
- externalDNS
- 배포
- 헬름으로 배포
- OIDC 공급자와 관련된 설정
Addons 업데이트 eksctl을 사용하여 이미 생성된 클러스터에 Addons를 추가하거나 업데이트하려면, eksctl utils associate-iam-oidc-provider와 eksctl create addon 명령을 사용합니다.
# OIDC 제공자 연결
eksctl utils associate-iam-oidc-provider --region ${AWS_DEFAULT_REGION} --cluster myeks --approve

# VPC CNI 업데이트
eksctl create addon --name vpc-cni --cluster myeks --region ${AWS_DEFAULT_REGION} --force

# kube-proxy 업데이트
eksctl create addon --name kube-proxy --cluster myeks --region ${AWS_DEFAULT_REGION} --force

# CoreDNS 업데이트
eksctl create addon --name coredns --cluster myeks --region ${AWS_DEFAULT_REGION} --force

# EBS CSI 드라이버 추가
eksctl create addon --name aws-ebs-csi-driver --cluster myeks --region ${AWS_DEFAULT_REGION} --well-known-policies ebs-csi-controller --force

# EFS CSI 드라이버 추가
eksctl create addon --name aws-efs-csi-driver --cluster myeks --region ${AWS_DEFAULT_REGION} --well-known-policies efs-csi-controller --force
IAM Service Account 생성 새로운 IAM 서비스 계정을 생성하고 클러스터에 추가하려면 다음과 같이 eksctl create iamserviceaccount 명령어를 사용합니다.
# Load Balancer Controller용 서비스 계정 추가
eksctl create iamserviceaccount \
  --name aws-load-balancer-controller \
  --namespace kube-system \
  --cluster myeks \
  --attach-policy-arn arn:aws:iam::aws:policy/AWSLoadBalancerControllerPolicy \
  --approve

# EBS CSI Controller용 서비스 계정 추가
eksctl create iamserviceaccount \
  --name ebs-csi-controller-sa \
  --namespace kube-system \
  --cluster myeks \
  --attach-policy-arn arn:aws:iam::aws:policy/service-role/AmazonEBSCSIDriverPolicy \
  --approve

# EFS CSI Controller용 서비스 계정 추가
eksctl create iamserviceaccount \
  --name efs-csi-controller-sa \
  --namespace kube-system \
  --cluster myeks \
  --attach-policy-arn arn:aws:iam::aws:policy/service-role/AmazonEFSCIDriverPolicy \
  --approve

# Karpenter Controller용 서비스 계정 추가
eksctl create iamserviceaccount \
  --name karpenter \
  --namespace karpenter \
  --cluster myeks \
  --attach-policy-arn arn:aws:iam::${AWS_ACCOUNT_ID}:policy/KarpenterControllerPolicy-myeks클러스터 \
  --approve
IAM Role 매핑 업데이트 IAM 역할 매핑을 업데이트하려면 다음을 사용하여 매핑을 생성합니다.
eksctl create iamidentitymapping \
  --cluster myeks \
  --region ${AWS_DEFAULT_REGION} \
  --arn arn:aws:iam::${AWS_ACCOUNT_ID}:role/KarpenterNodeRole-myeks \
  --group system:bootstrappers \
  --group system:nodes \
  --username system:node:
환경 변수
export | egrep 'ACCOUNT|AWS_|CLUSTER' | egrep -v 'SECRET|KEY'

// 환경 변수 설정
export KARPENTER_VERSION=v0.30.0
export TEMPOUT=$(mktemp)

echo $KARPENTER_VERSION; echo $CLUSTER_NAME; echo $AWS_DEFAULT_REGION; echo $AWS_ACCOUNT_ID $TEMPOUT
- 카펜터 셋팅
IAM Service Account 생성
eksctl create iamserviceaccount \
  --cluster ${CLUSTER_NAME} \
  --namespace karpenter \
  --name karpenter \
  --role-name ${CLUSTER_NAME}-karpenter \
  --attach-policy-arn arn:aws:iam::${ACCOUNT_ID}:policy/KarpenterControllerPolicy-${CLUSTER_NAME} \
  --override-existing-serviceaccounts \
  --approve
IAM Identity Mapping 추가
eksctl create iamidentitymapping \
  --cluster ${CLUSTER_NAME} \
  --arn arn:aws:iam::${ACCOUNT_ID}:role/KarpenterNodeRole-${CLUSTER_NAME} \
  --username system:node: \
  --group system:bootstrappers \
  --group system:nodes
이후 Provisioner 셋팅
cat <<EOF | kubectl apply -f -
apiVersion: karpenter.sh/v1alpha5
kind: Provisioner
metadata:
  name: default
spec:
  consolidation:
    enabled: true
  labels:
    type: karpenter
  limits:
    resources:
      cpu: 1000
      memory: 1000Gi
  providerRef:
    name: default
  requirements:
    - key: karpenter.sh/capacity-type
      operator: In
      values:
        - on-demand
    - key: node.kubernetes.io/instance-type
      operator: In
      values:
        - t2.micro
        - t3.small
        - t3.medium
        - t3.large
EOF
- 새로운 서비스 계정과 IAM 역할 함께 생성 ```shell eksctl create iamserviceaccount
–name ecr-access-sa \ # 서비스 계정 이름 –namespace default \ # 네임스페이스 –cluster myeks2 \ # EKS 클러스터 이름 –attach-policy-arn arn:aws:iam::aws:policy/AmazonEC2ContainerRegistryReadOnly \ # ECR 접근 정책 연결 –approve \ # 자동 승인 –role-name AmazonEKS_ECR_Access_Role # IAM 역할 이름
5. 메트릭서버 설치 및 배포

```shell
kubectl apply -f https://github.com/kubernetes-sigs/metrics-server/releases/latest/download/components.yaml


cat <<EOF | kubectl apply -f -

apiVersion: v1
kind: Namespace
metadata:
  name: carmid
---
apiVersion: apps/v1
kind: Deployment
metadata:
  namespace: carmid
  name: deployment-carmidapi
spec:
  selector:
    matchLabels:
      app.kubernetes.io/name: app-carmidapi
  replicas: 2
  template:
    metadata:
      labels:
        app.kubernetes.io/name: app-carmidapi
    spec:
      containers:
      - image: 211125358984.dkr.ecr.ap-northeast-2.amazonaws.com/mixproject/carmidapi:latest
        imagePullPolicy: Always
        name: app-carmidapi
        ports:
        - containerPort: 8080
        startupProbe:
          httpGet:
            path: /actuator/health
            port: 8080
          periodSeconds: 10
          failureThreshold: 30
        livenessProbe:
          httpGet:
            path: /actuator/health
            port: 8080
          periodSeconds: 10
          failureThreshold: 3
        readinessProbe:
          httpGet:
            path: /actuator/health
            port: 8080
          periodSeconds: 5
          failureThreshold: 3
---
apiVersion: v1
kind: Service
metadata:
  namespace: carmid
  name: service-carmidapi
spec:
  ports:
    - port: 8080
      targetPort: 8080
      protocol: TCP
  type: NodePort
  selector:
    app.kubernetes.io/name: app-carmidapi
---
apiVersion: networking.k8s.io/v1
kind: Ingress
metadata:
  namespace: carmid
  name: ingress-carmidapi
  annotations:
    alb.ingress.kubernetes.io/scheme: internet-facing
    alb.ingress.kubernetes.io/target-type: ip
    alb.ingress.kubernetes.io/healthcheck-path: /actuator/health
spec:
  ingressClassName: alb
  rules:
    - host: litmobility.net
      http:
        paths:
        - path: /
          pathType: Prefix
          backend:
            service:
              name: service-carmidapi
              port:
                number: 8080
---
apiVersion: autoscaling/v2
kind: HorizontalPodAutoscaler
metadata:
  name: hpa-carmidapi
  namespace: carmid
spec:
  scaleTargetRef:
    apiVersion: apps/v1
    kind: Deployment
    name: deployment-carmidapi
  minReplicas: 2
  maxReplicas: 10
  metrics:
    - type: Resource
      resource:
        name: cpu
        target:
          type: Utilization
          averageUtilization: 50

EOF


kubectl delete ingress ingress-carmidapi -n carmid

kubectl delete svc service-carmidapi -n carmid && kubectl delete deploy deployment-carmidapi -n carmid && kubectl delete hpa hpa-carmidapi -n carmid && kubectl delete ns carmid
Prometheus 영구 볼륨 설정 Storage Class 설정
Prometheus를 배포하던 pod가 중지되거나 삭제될 시 그동안 수집했던 데이터들이 전부 휘발된다. 그러므로 pod가 중지되거나 삭제되어도 volume이 남아있을 수 있도록 설정해야 한다.
// Amazon EBS CSI Driver 버전 정보 (True = 기본 설치 버전)
aws eks describe-addon-versions \
    --addon-name aws-ebs-csi-driver \
    --kubernetes-version 1.26 \
    --query "addons[].addonVersions[].[addonVersion, compatibilities[].defaultVersion]" \
    --output text
IRSA 생성
// AWS 관리형 IAM Policy인 AmazonEBSCSIDriverPolicy 사용
eksctl create iamserviceaccount \
  --name ebs-csi-controller-sa \
  --namespace kube-system \
  --cluster ${CLUSTER_NAME} \
  --attach-policy-arn arn:aws:iam::aws:policy/service-role/AmazonEBSCSIDriverPolicy \
  --approve \
  --role-only \
  --role-name AmazonEKS_EBS_CSI_DriverRole

// IRSA 확인
eksctl get iamserviceaccount --cluster ${CLUSTER_NAME}
Amazon EBS CSI Driver 설치
eksctl create addon --name aws-ebs-csi-driver\
 --cluster ${CLUSTER_NAME}\
 --service-account-role-arn arn:aws:iam::${ACCOUNT_ID}:role/AmazonEKS_EBS_CSI_DriverRole\
 --force
SC생성
cat <<EOF | kubectl apply -f -
kind: StorageClass
apiVersion: storage.k8s.io/v1
metadata:
  name: monitor-sc
provisioner: kubernetes.io/aws-ebs
parameters:
  type: gp2
  fsType: ext4
reclaimPolicy: Retain
allowVolumeExpansion: true
volumeBindingMode: WaitForFirstConsumer
  EOF
Prometheus-Grafana 배포 helm repo 추가
helm repo add prometheus-community https://prometheus-community.github.io/helm-charts
values.yaml
alertmanager:
  enabled: true
  alertmanagerSpec:
    storage:
      volumeClaimTemplate:
        spec:
          storageClassName: monitor-sc
          accessModes: ["ReadWriteOnce"]
          resources:
            requests:
              storage: 10Gi

grafana:
  defaultDashboardsEnabled: true
  adminPassword: admin
  persistence:
    enabled: true
    storageClassName: monitor-sc
    accessModes: ["ReadWriteOnce"]
    resources:
      requests:
        storage: 10Gi

prometheus:
  prometheusSpec:
    retention: 5y
    scrapeInterval: 15s
    storageSpec:
      volumeClaimTemplate:
        spec:
          storageClassName: monitor-sc
          accessModes: ["ReadWriteOnce"]
          resources:
            requests:
              storage: 100Gi
생성
# deploy prometheus-grafana-stack using helm
helm install prometheus -n monitoring prometheus-community/kube-prometheus-stack -f values.yaml

# 참고 update
helm upgrade prometheus -n monitoring prometheus-community/kube-prometheus-stack -f values.yaml
Ingress 생성전 권한 설정을 해준다.
{
    "Version": "2012-10-17",
    "Statement": [
        {
            "Effect": "Allow",
            "Action": [
                "acm:DescribeCertificate",
                "acm:ListCertificates",
                "acm:GetCertificate",
                "ec2:AuthorizeSecurityGroupIngress",
                "ec2:CreateSecurityGroup",
                "ec2:CreateTags",
                "ec2:DeleteTags",
                "ec2:DeleteSecurityGroup",
                "ec2:DescribeAccountAttributes",
                "ec2:DescribeAddresses",
                "ec2:DescribeInstances",
                "ec2:DescribeInstanceStatus",
                "ec2:DescribeInternetGateways",
                "ec2:DescribeNetworkInterfaces",
                "ec2:DescribeSecurityGroups",
                "ec2:DescribeSubnets",
                "ec2:DescribeTags",
                "ec2:DescribeVpcs",
                "ec2:ModifyInstanceAttribute",
                "ec2:ModifyNetworkInterfaceAttribute",
                "ec2:RevokeSecurityGroupIngress",
                "elasticloadbalancing:AddTags",
                "elasticloadbalancing:CreateListener",
                "elasticloadbalancing:CreateLoadBalancer",
                "elasticloadbalancing:CreateRule",
                "elasticloadbalancing:CreateTargetGroup",
                "elasticloadbalancing:DeleteListener",
                "elasticloadbalancing:DeleteLoadBalancer",
                "elasticloadbalancing:DeleteRule",
                "elasticloadbalancing:DeleteTargetGroup",
                "elasticloadbalancing:DeregisterTargets",
                "elasticloadbalancing:DescribeListeners",
                "elasticloadbalancing:DescribeLoadBalancers",
                "elasticloadbalancing:DescribeLoadBalancerAttributes",
                "elasticloadbalancing:DescribeRules",
                "elasticloadbalancing:DescribeSSLPolicies",
                "elasticloadbalancing:DescribeTags",
                "elasticloadbalancing:DescribeTargetGroups",
                "elasticloadbalancing:DescribeTargetGroupAttributes",
                "elasticloadbalancing:DescribeTargetHealth",
                "elasticloadbalancing:ModifyListener",
                "elasticloadbalancing:ModifyLoadBalancerAttributes",
                "elasticloadbalancing:ModifyRule",
                "elasticloadbalancing:ModifyTargetGroup",
                "elasticloadbalancing:ModifyTargetGroupAttributes",
                "elasticloadbalancing:RegisterTargets",
                "elasticloadbalancing:SetIpAddressType",
                "elasticloadbalancing:SetSecurityGroups",
                "elasticloadbalancing:SetSubnets",
                "elasticloadbalancing:SetWebAcl",
                "iam:CreateServiceLinkedRole",
                "iam:GetServerCertificate",
                "iam:ListServerCertificates",
                "cognito-idp:DescribeUserPoolClient",
                "waf-regional:GetWebACLForResource",
                "waf-regional:GetWebACL",
                "waf-regional:AssociateWebACL",
                "waf-regional:DisassociateWebACL",
                "tag:GetResources",
                "tag:TagResources",
                "waf:GetWebACL"
            ],
            "Resource": "*"
        }
    ]
}
iam policy creation
aws iam create-policy \
    --policy-name AWSLoadBalancerControllerIAMPolicy \
    --policy-document file://iam_policy.json
eksctl create iamserviceaccount \
  --cluster=$CLUSTER_NAME \
  --namespace=kube-system \
  --name=aws-load-balancer-controller \
  --attach-policy-arn=arn:aws:iam::$ACCOUNT_ID:policy/AWSLoadBalancerControllerIAMPolicy \
  --override-existing-serviceaccounts \
  --approve
AWS Load Balancer Controller 설치
Helm Repository 추가
helm repo add eks https://aws.github.io/eks-charts
Helm Chart로 LoadBalancer 설치
helm install aws-load-balancer-controller eks/aws-load-balancer-controller \
    --set clusterName=$CLUSTERNAME \
    --set serviceAccount.create=false \
    --set region=ap-northeast-2 \
    --set vpcId=$VPC_ID \
    --set serviceAccount.name=aws-load-balancer-controller \
    -n kube-system
Ingress 생성
cat <<EOF | kubectl apply -f -
apiVersion: networking.k8s.io/v1
kind: Ingress
metadata:
  namespace: monitoring
  name: grafana-ingress
  annotations:
    kubernetes.io/ingress.class: alb
    alb.ingress.kubernetes.io/scheme: internet-facing
    alb.ingress.kubernetes.io/target-type: ip
spec:
  rules:
    - http:
        paths:
          - path: /
            pathType: Prefix
            backend:
              service:
                name: prometheus-grafana
                port:
                  number: 80
  EOF
부하테스트
# 특정파드 접속
kubectl exec -it <pod-name> -- /bin/sh


# 간단한 무한 루프
while true; do :; done
아르고 CD 설치
https://argo-cd.readthedocs.io/en/stable/getting_started/
- Argo CD 설치
kubectl create namespace argocd kubectl apply -n argocd -f https://raw.githubusercontent.com/argoproj/argo-cd/stable/manifests/ha/install.yaml - 로드밸런서 생성으로 외부 접속
kubectl patch svc argocd-server -n argocd -p '{"spec": {"type": "LoadBalancer"}}' - Argo CD password 확인 최초 로그인 시 사용할 비밀번호 확인
kubectl -n argocd get secret argocd-initial-admin-secret -o jsonpath="{.data.password}" | base64 -d; echo - 접속 주소 확인
kubectl get svc argocd-server -n argocd
kubectl annotate service argocd-server "external-dns.alpha.kubernetes.io/hostname=argo.$MyDomain"
helm 차트로 배포 하기 우선 helm 차트로 배포후 올려서 확인해 본다.
네임스페이스 생성 및 권한
kubectl create namespace carmidapi

eksctl create iamserviceaccount \
  --name ecr-access-sa \
  --namespace carmidapi \
  --cluster myeks2 \
  --attach-policy-arn arn:aws:iam::aws:policy/AmazonEC2ContainerRegistryReadOnly \
  --approve \
  --role-name AmazonEKS_ECR_Access_Role_Carmidapi
alb 생성(url이 변경되지 않도록 하기 위함)
aws elbv2 create-load-balancer \
  --name my-existing-alb \
  --subnets subnet-xxxxxxxx subnet-yyyyyyyy \
  --security-groups sg-xxxxxxxx \
  --scheme internet-facing \
  --type application
ALB Listener와 Target Group 생성: ALB에 리스너와 타겟 그룹을 생성. 타겟 그룹에 Kubernetes Service가 사용될 대상(예: IP 또는 인스턴스)을 등록
aws elbv2 create-target-group \
  --name my-existing-alb-tg \
  --protocol HTTP \
  --port 8080 \
  --vpc-id vpc-xxxxxxxx \
  --target-type ip

aws elbv2 create-listener \
  --load-balancer-arn <alb-arn> \
  --protocol HTTP \
  --port 8080 \
  --default-actions Type=forward,TargetGroupArn=<target-group-arn>
기존 kubectl로 생성한 carmidapi삭제
kubectl delete deployment carmidapi --namespace default
kubectl delete service carmidapi-service --namespace default
kubectl delete hpa carmidapi --namespace default
헬름차트 시작
carmidapichart/
  ├── Chart.yaml
  ├── values.yaml
  └── templates/
      ├── deployment.yaml
      ├── service.yaml
      └── hpa.yaml
Chart.yaml
apiVersion: v2
name: carmidapichart
description: A Helm chart for deploying CarmidAPI on EKS without Provisioner

# 차트 버전
version: 0.1.0

# 애플리케이션 버전
appVersion: "1.16.0"
values.yaml
replicaCount: 1

image:
   repository: 211125358984.dkr.ecr.ap-northeast-2.amazonaws.com/mixproject/carmidapi
   tag: latest
   pullPolicy: IfNotPresent

serviceAccount:
   name: ecr-access-sa

service:
   enabled: true
   type: LoadBalancer
   port: 8080
   targetPort: 8080

resources:
   requests:
      cpu: 500m
      memory: 256Mi
   limits:
      cpu: 1
      memory: 512Mi

autoscaling:
   enabled: true
   minReplicas: 1
   maxReplicas: 10
   targetCPUUtilizationPercentage: 50

springProfilesActive: "dev"
templates/deployment.yaml
apiVersion: apps/v1
kind: Deployment
metadata:
   name: carmidapi-deployment
   namespace: carmidapi
spec:
   replicas:
   selector:
      matchLabels:
         app: carmidapi
   template:
      metadata:
         labels:
            app: carmidapi
      spec:
         serviceAccountName:
         containers:
            - name: carmidapi
              image: ":"
              imagePullPolicy:
              ports:
                 - containerPort:
              env:
                 - name: SPRING_PROFILES_ACTIVE
                   value:
              resources:
                 requests:
                    cpu:
                    memory:
                 limits:
                    cpu:
                    memory:
templates/service.yaml
apiVersion: v1
kind: Service
metadata:
   name: carmidapi-service
   namespace: carmidapi
   annotations:
      service.beta.kubernetes.io/aws-load-balancer-nlb-target-type: ip
      service.beta.kubernetes.io/aws-load-balancer-scheme: internet-facing
      service.beta.kubernetes.io/aws-load-balancer-cross-zone-load-balancing-enabled: "true"
      service.beta.kubernetes.io/aws-load-balancer-backend-protocol: "http"
spec:
   type:
   loadBalancerClass: service.k8s.aws/nlb
   selector:
      app: carmidapi
   ports:
      - protocol: TCP
        port:
        targetPort:
templates/hpa.yaml
apiVersion: autoscaling/v2
kind: HorizontalPodAutoscaler
metadata:
   name: carmidapi-hpa
   namespace: carmidapi
spec:
   scaleTargetRef:
      apiVersion: apps/v1
      kind: Deployment
      name: carmidapi-deployment
   minReplicas:
   maxReplicas:
   metrics:
      - type: Resource
        resource:
           name: cpu
           target:
              type: Utilization
              averageUtilization:
배포
# 생성
helm install carmidapi ./carmidapichart --namespace carmidapi

# 업데이트
helm upgrade carmidapi ./carmidapichart --namespace carmidapi

# 제거
helm uninstall carmidapi --namespace carmidapi

# 확인
helm list
외부 도메인 연결
도메인 설치
// 도메인 주소 변수 지정
MyDomain=<자신의 도메인>

echo "export MyDomain=$MyDomain" >> /etc/profile

echo $MyDomain

// 도메인의 Hosted Zone 정보 확인
aws route53 list-hosted-zones-by-name --dns-name "${MyDomain}." | jq

// 도메인 ID 변수 지정
MyDnsHostedZoneId=`aws route53 list-hosted-zones-by-name --dns-name "${MyDomain}." --query "HostedZones[0].Id" --output text`

echo "export MyDnsHostedZoneId=$MyDnsHostedZoneId" >> /etc/profile

echo $MyDnsHostedZoneId
ExternalDNS 설치
// yaml 파일 다운로드 및 확인
curl -s -O https://raw.githubusercontent.com/cloudneta/cnaeblab/master/_data/externaldns.yaml

cat externaldns.yaml | yh

// yaml 파일에 변수 치환 후 배포
MyDomain=$MyDomain MyDnsHostedZoneId=$MyDnsHostedZoneId envsubst < externaldns.yaml | kubectl apply -f -

// ExternalDNS 확인
kubectl get pod -l app.kubernetes.io/name=external-dns -n kube-system
NLB에 ExternalDNS로 연결 NLB에 ExternalDNS를 통해서 Route53의 도메인 주소를 연결한다. 연결하고자 하는 서비스(NLB)에 다음과 같은 어노테이션을 추가해주면 된다.
kubectl annotate service tetris "external-dns.alpha.kubernetes.io/hostname=www.$MyDomain"
깃 소스 업로드
codecommit 생성
git init
# 리모트 리포지토리 추가
git remote add origin <CodeCommit 리포지토리 URL>

git add .
git commit -m "Add Helm chart files"
git push -u origin master
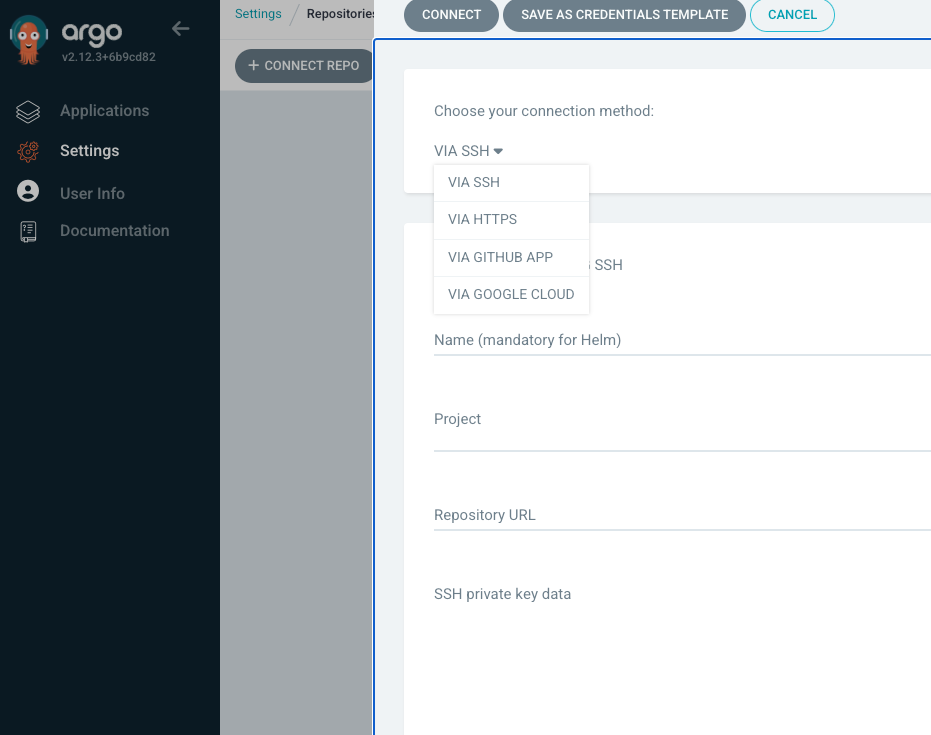
아르고cd repo등록 Settings > Repositories > VIA HTTPS 선택 후 등록
이후 APPLICATIONS > NEW APP 등록