[자바 - 고급 2편, I/O, 네트워크, 리플렉션] I/O 기본1
- 스트림 시작1
- 스트림 시작2
- InputStream, OutputStream
- 파일 입출력과 성능 최적화1 - 하나씩 쓰기
- 파일 입출력과 성능 최적화2 - 버퍼 활용
- 파일 입출력과 성능 최적화3 - Buffered 스트림 쓰기
- 파일 입출력과 성능 최적화4 - Buffered 스트림 읽기
- 파일 입출력과 성능 최적화5 - 한 번에 쓰기
- 정리
스트림 시작1
자바가 가진 데이터를
hello.dat라는 파일에 저장하는 예제를 통해출력 스트림(Java > 외부),입력 스트림(외부 > Java)을 알아본다.
주의!: 실행 전에 반드시 프로젝트 하위에
temp라는 폴더를 만들어야 한다. 그렇지 않으면java.io.FileNotFoundException예외가 발생한다.
import java.io.FileInputStream;
import java.io.FileOutputStream;
import java.io.IOException;
public class StreamStartMain1 {
    public static void main(String[] args) throws IOException {
        FileOutputStream fos = new FileOutputStream("temp/hello.dat"); // 출력 스트림
        fos.write(65); // 출력
        fos.write(66);
        fos.write(67);
        fos.close();

        FileInputStream fis = new FileInputStream("temp/hello.dat"); // 데이터를 읽어오는 스트림
        System.out.println(fis.read());
        System.out.println(fis.read());
        System.out.println(fis.read());
        System.out.println(fis.read());
        fis.close(); // 내부 객체는 자동으로 GC가 되지만 외부 자원은 사용 후 반드시 닫아주어야 한다.
    }
}
실행 결과
65
66
67
-1
실행 결과 - temp/hello.dat**
우리가 사용하는 개발툴이나 텍스트 편집기는 UTF-8 또는 MS949 문자 집합을 사용해서 byte 단위의 데이터를 문자로 디코딩해서 보여준다.ABC
참고: 파일 append 옵션
FileOutputStream의 생성자에는append라는 옵션이 있다.
true: 기존 파일의 끝에 이어서 쓴다.false: 기존 파일의 데이터를 지우고 처음부터 다시 쓴다. (기본값)
new FileOutputStream("temp/hello.dat", true); //
예제2
파일의 데이터를 읽을 때 파일의 끝까지 읽는 방법을 알아본다.
import java.io.FileInputStream;
import java.io.FileOutputStream;
import java.io.IOException;

public class StreamStartMain2 {

    public static void main(String[] args) throws IOException {

        FileOutputStream fos = new FileOutputStream("temp/hello.dat");
        fos.write(65);
        fos.write(66);
        fos.write(67);
        fos.close();

        FileInputStream fis = new FileInputStream("temp/hello.dat");
        int data;
        while ((data = fis.read()) != -1) { // `read()` 메서드는 파일의 끝에 도달하면 -1을 반환
            System.out.println(data);
        }
        fis.close();
    }
}
스트림 시작2
byte[]을 사용해서 데이터를 원하는 크기 만큼 더 편리하게 저장하고 읽는 방법을 알아보자.
import java.io.FileInputStream;
import java.io.FileOutputStream;
import java.io.IOException;
import java.util.Arrays;
public class StreamStartMain3 {
    public static void main(String[] args) throws IOException {
        FileOutputStream fos = new FileOutputStream("temp/hello.dat");
        byte[] input = {65, 66, 67};
        fos.write(input); // `byte[]` 에 원하는 데이터를 담고 `write()` 에 전달하면 해당 데이터를 한 번에 출력할 수 있다.
        fos.close();

        FileInputStream fis = new FileInputStream("temp/hello.dat");
        byte[] buffer = new byte[10];
        int readCount = fis.read(buffer, 0, 10);// read(데이터가 읽혀지는 버퍼, 데이터 기록되는 `byte[]` 의 인덱스 시작 위치, 읽어올 byte의 최대 길이)
        System.out.println("readCount = " + readCount);
        System.out.println(Arrays.toString(buffer));
        fis.close();
    }
}
실행 결과
readCount = 3
[65, 66, 67, 0, 0, 0, 0, 0, 0, 0]
참고 read(byte[])
- 참고로
offset,length를 생략한read(byte[])메서드도 있다. 이 메서드는 다음 값을 가진다.offset: 0length:byte[].length
예제4
모든 byte 한 번에 읽기
import java.io.FileInputStream;
import java.io.FileOutputStream;
import java.io.IOException;
import java.util.Arrays;
public class StreamStartMain4 {
    public static void main(String[] args) throws IOException {
        FileOutputStream fos = new FileOutputStream("temp/hello.dat");
        byte[] input = {65, 66, 67};
        fos.write(input);
        fos.close();

        FileInputStream fis = new FileInputStream("temp/hello.dat");
        byte[] readBytes = fis.readAllBytes(); // 모든 데이터를 한 번에 읽어 온다.
        System.out.println(Arrays.toString(readBytes));
        fis.close();
    }
}
실행 결과
[65, 66, 67]
read(byte[], offset, length)
- 부분 읽기
- 메모리 제어 가능
- 대용량 파일 처리에 적합
readAllBytes()
- 전체 읽기
- 편리하지만 메모리 부담 큼
- 작은 파일 처리에 적합, 큰 파일엔 위험 (OOM 가능)
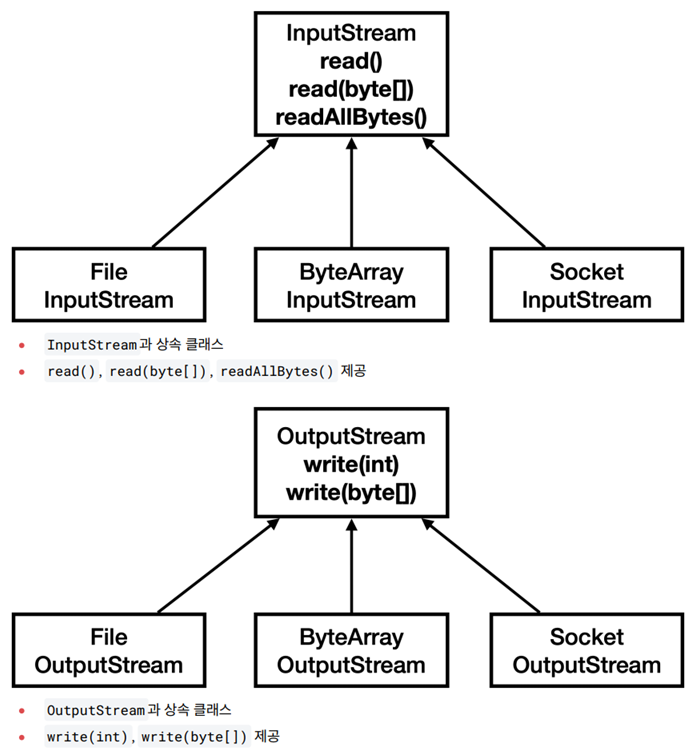
InputStream, OutputStream
스트림을 사용하면 파일, 네트워크, 콘솔, 메모리 등 다양한 입출력을 일관된 방식으로 처리할 수 있으며, 자바는 이에 맞는 다양한 구현 클래스(예:
FileInputStream,FileOutputStream)를 제공한다.
메모리 스트림
ByteArrayOutputStream과ByteArrayInputStream은 메모리에서 스트림 입출력을 가능하게 하며, 테스트나 데이터 확인 용도로 주로 사용된다. 참고로 메모리에 어떤 데이터를 저장하고 읽을 때는 컬렉션이나 배열을 사용하면 되기 때문에, 이 기능은 잘 사용하지 않는다.
import java.io.ByteArrayInputStream;
import java.io.ByteArrayOutputStream;
import java.io.IOException;
import java.util.Arrays;

public class ByteArrayStreamMain {

    public static void main(String[] args) throws IOException {
        byte[] input = {1, 2, 3};

        // 메모리에 쓰기
        ByteArrayOutputStream baos = new ByteArrayOutputStream();
        baos.write(input);

        // 메모리에서 읽기
        ByteArrayInputStream bais = new ByteArrayInputStream(baos.toByteArray());
        byte[] bytes = bais.readAllBytes();
        System.out.println(Arrays.toString(bytes));
    }
}
실행 결과
[1, 2, 3]
콘솔 스트림
우리가 자주 사용했던System.out은 자바가 자동 생성하는PrintStream이며,OutputStream를 상속받아write과 자체 기능(println)을 모두 제공한다.
import java.io.IOException;
import java.io.PrintStream;

import static java.nio.charset.StandardCharsets.UTF_8;

public class PrintStreamMain {
    public static void main(String[] args) throws IOException {
        PrintStream printStream = System.out;

        byte[] bytes = "Hello!\n".getBytes(UTF_8);
        printStream.write(bytes);
        printStream.println("Print!");
    }
}
실행 결과
Hello!
Print!
파일 입출력과 성능 최적화1 - 하나씩 쓰기
파일을 효과적으로 더 빨리 읽고 쓰는 방법에 대해서 알아보자.
공통으로 사용할 상수 정의
public class BufferedConst {
    public static final String FILE_NAME = "temp/buffered.dat";
    public static final int FILE_SIZE = 10 * 1024 * 1024; // 10MB
    public static final int BUFFER_SIZE = 8192; // 8KB
}
예제1 - 쓰기
한 번 호출에 1byte가 만들어지며, 1000만번(10 * 1024 * 1024) 호출하면 10MB의 파일이 만들어지는 예제를 만든다.
import java.io.FileOutputStream;
import java.io.IOException;

import static io.buffered.BufferedConst.FILE_NAME;
import static io.buffered.BufferedConst.FILE_SIZE;

public class CreateFileV1 {

    public static void main(String[] args) throws IOException {
        FileOutputStream fos = new FileOutputStream(FILE_NAME);
        long startTime = System.currentTimeMillis();

        for (int i = 0; i < FILE_SIZE; i++) {
            fos.write(1);
        }
        fos.close();

        long endTime = System.currentTimeMillis();
        System.out.println("File created: " + FILE_NAME);
        System.out.println("File size: " + FILE_SIZE / 1024 / 1024 + "MB");
        System.out.println("Time taken: " + (endTime - startTime) + "ms");
    }
}
실행 결과 : 상당히 오랜 시간이 걸린다.
File created: temp/buffered.dat
File size: 10MB
Time taken: 14092ms
예제1 - 읽기
앞서 만든 파일에서 1byte씩 데이터를 읽는다.
import java.io.FileInputStream;
import java.io.IOException;

import static io.buffered.BufferedConst.FILE_NAME;

public class ReadFileV1 {

    public static void main(String[] args) throws IOException {
        FileInputStream fis = new FileInputStream(FILE_NAME);
        long startTime = System.currentTimeMillis();

        int fileSize = 0;
        int data;
        while ((data = fis.read()) != -1) {
            fileSize++;
        }
        fis.close();

        long endTime = System.currentTimeMillis();
        System.out.println("File name: " + FILE_NAME);
        System.out.println("File size: " + (fileSize / 1024 / 1024) + "MB");
        System.out.println("Time taken: " + (endTime - startTime) + "ms");
    }
}
실행 결과 : 상당히 오랜 시간이 걸린다.
File name: temp/buffered.dat
File size: 10MB
Time taken: 5003ms
파일 입출력과 성능 최적화2 - 버퍼 활용
이번에는
byte[]을 통해 배열에 담아서 한 번에 여러byte를 전달 해보자.
예제2 - 쓰기
디스크나 파일 시스템에서 데이터를 읽고 쓰는 기본 단위가 보통
4KB또는8KB이기 때문에 버퍼의 크기가 커진다 해도 효율에는 한계가 있다. 따라서 버퍼의 크기는 보통4KB,8KB정도로 잡는 것이 효율적이다.
import java.io.FileOutputStream;
import java.io.IOException;

import static io.buffered.BufferedConst.*;

public class CreateFileV2 {
    public static void main(String[] args) throws IOException {
        FileOutputStream fos = new FileOutputStream(FILE_NAME);
        long startTime = System.currentTimeMillis();

        byte[] buffer = new byte[BUFFER_SIZE];
        int bufferIndex = 0;

        for (int i = 0; i < FILE_SIZE; i++) {
            buffer[bufferIndex++] = 1;

            // 버퍼가 가득 차면 쓰고, 버퍼를 비운다.
            if (bufferIndex == BUFFER_SIZE) {
                fos.write(buffer); // 버퍼 크기만큼 한번에 전달
                bufferIndex = 0;
            }
        }

        // 끝 부분에 오면 버퍼가 가득차지 않고 남아있을 수 있다. 버퍼에 남은 부분 쓰기
        if (bufferIndex > 0) {
            fos.write(buffer, 0, bufferIndex);
        }
        fos.close();

        long endTime = System.currentTimeMillis();
        System.out.println("File created: " + FILE_NAME);
        System.out.println("File size: " + FILE_SIZE / 1024 / 1024 + "MB");
        System.out.println("Time taken: " + (endTime - startTime) + "ms");
    }
}
예제2 - 읽기
import java.io.FileInputStream;
import java.io.IOException;

import static io.buffered.BufferedConst.BUFFER_SIZE;
import static io.buffered.BufferedConst.FILE_NAME;

public class ReadFileV2 {

    public static void main(String[] args) throws IOException {
        FileInputStream fis = new FileInputStream(FILE_NAME);
        long startTime = System.currentTimeMillis();

        byte[] buffer = new byte[BUFFER_SIZE];
        int fileSize = 0;
        int size;
        while ((size = fis.read(buffer)) != -1) {
            fileSize += size;
        }
        fis.close();

        long endTime = System.currentTimeMillis();
        System.out.println("File name: " + FILE_NAME);
        System.out.println("File size: " + (fileSize / 1024 / 1024) + "MB");
        System.out.println("Time taken: " + (endTime - startTime) + "ms");
    }
}
실행 결과
File name: temp/buffered.dat
File size: 10MB
Time taken: 5ms
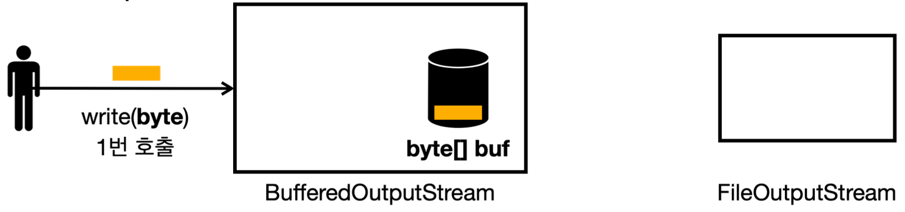
파일 입출력과 성능 최적화3 - Buffered 스트림 쓰기
BufferedOutputStream은 버퍼 기능을 내부에서 대신 처리해준다. 따라서 단순한 코드를 유지하면서 버퍼를 사용 할 수 있다.BufferdOutputStream은OutputStream을 상속받는다.
import java.io.BufferedOutputStream;
import java.io.FileOutputStream;
import java.io.IOException;

import static io.buffered.BufferedConst.*;

public class CreateFileV3 {

    public static void main(String[] args) throws IOException {
        FileOutputStream fos = new FileOutputStream(FILE_NAME);
        BufferedOutputStream bos = new BufferedOutputStream(fos, BUFFER_SIZE);
        long startTime = System.currentTimeMillis();

        for (int i = 0; i < FILE_SIZE; i++) {
            bos.write(1);
        }
        bos.close();

        long endTime = System.currentTimeMillis();
        System.out.println("File created: " + FILE_NAME);
        System.out.println("File size: " + FILE_SIZE / 1024 / 1024 + "MB");
        System.out.println("Time taken: " + (endTime - startTime) + "ms");
    }
}
BufferedOutputStream 실행 순서
아래의 과정이 반복 된다.


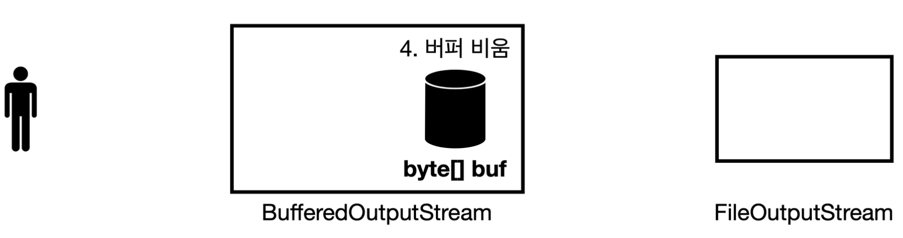
flush()
버퍼가 다 차지 않아도 버퍼에 남아있는 데이터를 전달하려면
flush()라는 메서드를 호출하면 된다.
close()
BufferedOutputStream을close()로 닫으면 먼저 내부에서flush()를 호출한다. 따라서 버퍼에 남아 있는 데이터를 모두 전달하고 비운다.
기본 스트림, 보조 스트림
- 기본 스트림:
FileOutputStream처럼 혼자서도 입출력이 가능한 스트림 - 보조 스트림:
BufferedOutputStream처럼 기본 스트림에 기능을 추가하는 스트림 BufferedOutputStream은 버퍼링 기능을 추가해 속도 향상을 도와준다.- 생성 시 반드시
OutputStream타입 대상(예:FileOutputStream)을 넘겨줘야 한다.
단독 사용 불가능 예시
new BufferedOutputStream(); // ❌ 안 됨

OutputStream out = new BufferedOutputStream(new FileOutputStream("output.txt")); // 반드시 기본 스트림을 감싸야 함
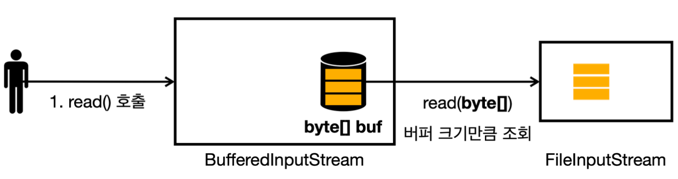
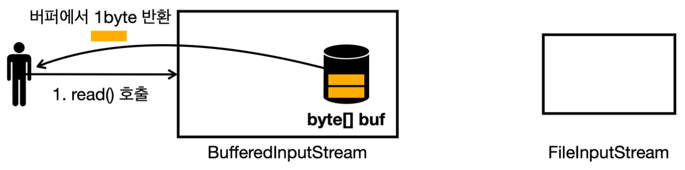
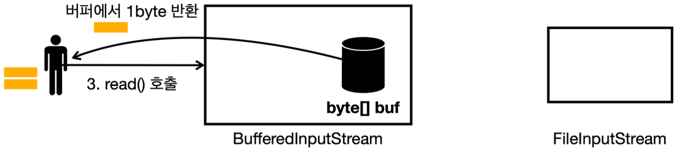
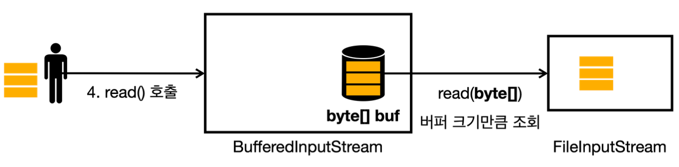
파일 입출력과 성능 최적화4 - Buffered 스트림 읽기
BufferdInputStream은InputStream을 상속받는다. 따라서 개발자 입장에서 보면InputStream과 같은 기능을 그대로 사용할 수 있다.
예제3 - 읽기
import java.io.BufferedInputStream;
import java.io.FileInputStream;
import java.io.IOException;

import static io.buffered.BufferedConst.BUFFER_SIZE;
import static io.buffered.BufferedConst.FILE_NAME;

public class ReadFileV3 {

    public static void main(String[] args) throws IOException {
        FileInputStream fis = new FileInputStream(FILE_NAME);
        BufferedInputStream bis = new BufferedInputStream(fis, BUFFER_SIZE);
        long startTime = System.currentTimeMillis();

        int fileSize = 0;
        int data;
        while ((data = bis.read()) != -1) {
            fileSize++;
        }
        bis.close();

        long endTime = System.currentTimeMillis();
        System.out.println("File name: " + FILE_NAME);
        System.out.println("File size: " + (fileSize / 1024 / 1024) + "MB");
        System.out.println("Time taken: " + (endTime - startTime) + "ms");
    }
}
실행 결과
File name: temp/buffered.dat
File size: 10MB
Time taken: 94ms
분석
버퍼를 직접 다루는 것 보다 BufferedXxx의 성능이 떨어지는 이유
예제1이 약 5초 정도 걸렸는데, 약 50배 정도 빨라졌지만예제2보다는 느리다. 이유는 동기화 때문이다.
BufferedOutputStream.write()구현체 예시
@Override
public void write(int b) throws IOException {
    if (lock != null) {
        lock.lock();
        try {
            implWrite(b);
        } finally {
            lock.unlock();
        }
    } else {
        synchronized (this) {
            implWrite(b);
        }
    }
}
BufferedOutputStream을 포함한BufferedXxx클래스는 모두 동기화 처리가 되어 있다. 결과적으로 락을 걸고 푸는 코드가 반복된다. 일반적인 상황이라면 이 정도 성능은 크게 문제가 되지는 않기 때문에 싱글 스레드여도BufferedXxx를 사용하면 충 분하다. 매우 큰 데이터를 다루어야 하고, 성능 최적화가 중요하다면예제2와 같이BufferedXxx를 참고해서 직접 버퍼를 다루는 방법을 고려하자.
파일 입출력과 성능 최적화5 - 한 번에 쓰기
파일의 크기가 크지 않다면 간단하게 한 번에 쓰고 읽는 것도 좋은 방법이다.
예제4 - 쓰기
디스크나 파일 시스템에서 데이터를 읽고 쓰는 기본 단위가 보통 4KB 또는 8KB이기 때문에, 한 번에 쓴다고해서 무작정 빠른 것은 아니다.
import java.io.FileOutputStream;
import java.io.IOException;

import static io.buffered.BufferedConst.FILE_NAME;
import static io.buffered.BufferedConst.FILE_SIZE;

public class CreateFileV4 {

    public static void main(String[] args) throws IOException {
        FileOutputStream fos = new FileOutputStream(FILE_NAME);
        long startTime = System.currentTimeMillis();

        byte[] buffer = new byte[FILE_SIZE];
        for (int i = 0; i < FILE_SIZE; i++) {
            buffer[i] = 1;
        }
        fos.write(buffer);
        fos.close();

        long endTime = System.currentTimeMillis();
        System.out.println("File created: " + FILE_NAME);
        System.out.println("File size: " + FILE_SIZE / 1024 / 1024 + "MB");
        System.out.println("Time taken: " + (endTime - startTime) + "ms");
    }
}
실행 결과
File created: temp/buffered.dat
File size: 10MB
Time taken: 15ms
예제4 - 읽기
import java.io.FileInputStream;
import java.io.IOException;

import static io.buffered.BufferedConst.FILE_NAME;

public class ReadFileV4 {

    public static void main(String[] args) throws IOException {
        FileInputStream fis = new FileInputStream(FILE_NAME);
        long startTime = System.currentTimeMillis();

        byte[] bytes = fis.readAllBytes(); // 한번에 데이터를 다 읽는다.
        fis.close();

        long endTime = System.currentTimeMillis();
        System.out.println("File name: " + FILE_NAME);
        System.out.println("File size: " + bytes.length / 1024 / 1024 + "MB");
        System.out.println("Time taken: " + (endTime - startTime) + "ms");
    }
}
실행 결과 :
readAllBytes()는 자바 구현에 따라 다르지만 보통 4KB, 8KB, 16KB 단위로 데이터를 읽어들인다.
File name: temp/buffered.dat
File size: 10MB
Time taken: 3ms
정리
- 파일의 크기가 크지 않아서, 메모리 사용에 큰 영향을 주지 않는다면 쉽고 빠르게 한 번에 처리하자.
- 성능이 중요하고 큰 파일을 나누어 처리해야 한다면, 버퍼를 직접 다루자.
- 성능이 크게 중요하지 않고, 버퍼 기능이 필요하면
BufferedXxx를 사용하자.BufferedXxx는 동기화 코드가 들어있어서 스레드 안전하지만, 약간의 성능 저하가 있다.